 Spring Boot - RestTemplate
# 简介
RestTemplate 是由 Spring 框架提供的一个可用于应用中调用 Rest 服务的类它简化了与 http 服务的通信方式,统一了 RESTFul 的标准,封装了 http 连接,我们只需要传入 url 及其返回值类型即可。相较于之前常用的 HttpClient,RestTemplate 是一种更为优雅的调用 RESTFul 服务的方式。
在 Spring 应用程序中访问第三方 REST 服务与使用 Spring RestTemplate 类有关。RestTemplate 类的设计原则与许多其他 Spring 的模板类(例如 JdbcTemplate)相同,为执行复杂任务提供了一种具有默认行为的简化方法。
RestTemplate 默认依赖 JDK 提供了 http 连接的能力(HttpURLConnection),如果有需要的话也可以通过 setRequestFactory 方法替换为例如 Apache HttpCompoent、Netty 或 OKHttp 等其他 Http libaray。
考虑到了 RestTemplate 类是为了调用 REST 服务而设计的,因此它的主要方法与 REST 的基础紧密相连就不足为奇了,后者时 HTTP 协议的方法:HEAD、GET、POST、PUT、DELETE、OPTIONS 例如,RestTemplate 类具有 headForHeaders()、getForObject()、putForObject(),put() 和 delete()等方法。
# 创建 RestTemplate
因为 RestTemplate 是 Spirng 框架提供的所以只要是一个 Springboot 项目就不用考虑导包的问题,这些都是提供好的。
但是 Spring 并没有将其加入 SpringBean 容器中,需要我们手动加入,因为我们首先创建一个 Springboot 配置类,再在配置类中将我们的RestTemlate注册到 Bean 容器中。
# 方法一
使用 Springboot 提供的 RestTemplateBuilder 构造类来构造一个 RestTemplate,可以自定义一些连接参数,如:连接超时时间,读取超时时间,还有认证信息等。
@Configuration
public class WebConfiguration {
    @Bean
    public RestTemplate restTemplate(RestTemplateBuilder builder){
        return builder
                // 设置连接超时时间
                .setConnectTimeout(Duration.ofSeconds(5000))
                // 设置读取超时时间
                .setReadTimeout(Duration.ofSeconds(5000))
                // 设置认证信息
                .basicAuthentication("username","password")
                // 设置根路径
                .rootUri("https://api.test.com/")
                //构建
                .build();
    }
}
2
3
4
5
6
7
8
9
10
11
12
13
14
15
16
17
在添加到 Spring 容器的时候,初始化需要的信息,当然不仅仅这些配置信息,具体的信息根据业务才决定,详细的配置信息去源码看。
# 添加自定义的拦截器
这种预先初始化 RestTemplate 的方式,还可以初始化拦截器,之后使用 RestTemplate 请求时,都会先走拦截器。
拦截器演示:
@Slf4j
public class CustomClientHttpRequestInterceptor implements ClientHttpRequestInterceptor {
    @Override
    public ClientHttpResponse intercept(HttpRequest request, byte[] body, ClientHttpRequestExecution execution) throws IOException {

        // 打印请求明细
        logRequestDetails(request,body);
        ClientHttpResponse response = execution.execute(request, body);
        // 打印响应明细
        logResponseDetails(response);

        return response;
    }

    private void logRequestDetails(HttpRequest request, byte[] body){
        log.debug("Headers:{}", request.getHeaders());
        log.debug("body:{}", new String(body, StandardCharsets.UTF_8));
        log.debug("{}:{}", request.getMethod(), request.getMethodValue());
    }

    private void logResponseDetails(ClientHttpResponse response) throws IOException {
        log.debug("Status code : {}", response.getStatusCode());
        log.debug("Status text : {}", response.getStatusText());
        log.debug("Headers : {}", response.getHeaders());
        log.debug("Response body: {}", StreamUtils.copyToString(response.getBody(), StandardCharsets.UTF_8));
    }
}
2
3
4
5
6
7
8
9
10
11
12
13
14
15
16
17
18
19
20
21
22
23
24
25
26
27
在初始化 RestTemplate 的时候,使用 RestTemplateBuilder 构造类,添加自定义拦截器,构造带有自定义拦截器的 RestTemplate 实例。
@Configuration
public class WebConfiguration {

    @Bean
    public RestTemplate restTemplate(RestTemplateBuilder builder){
        return builder
                // 其他配置信息
                .additionalInterceptors(new CustomClientHttpRequestInterceptor())
                // 构建
                .build();
    }
}
2
3
4
5
6
7
8
9
10
11
12
注意:请求和响应的流只会被读取一次,当我们在拦截器读取了 response 后,返回的 response 就读取不到刚刚读过的内容了。和 @ResponseBody 类似,只能用一次。
# 方法二
使用 RestTemplate 构造方法构造一个 RestTemlate,虽然不能像 RestTemplate 配置类那样更详细、更多样的配置参数,但是 RestTemplate 构造方法在一般情况是够用的。
new 一个 RestTmplate 时候,有三个构造方法选择:
- 无参构造:全部参数默认
- 指定
ClientHttpRequestFactory的构造方法可以指定自己实现的ClientHttpRequestFactory(客户端http请求工厂)其他的与无参构造相同 - 指定
List<HttpMessageConverter<?>>的构造方法可以指定自己是实现的HttpMessageConverter(Http消息转换器)传入其他与无参构造相同
这里演示第一种:
@Configuration
public class WebConfiguration {

    @Bean
    public RestTemplate restTemplate(){
        return new RestTemplate();
    }

}
2
3
4
5
6
7
8
9
# 选择
两者方法都可使用,前者提供了多样的自定义参数的选择,可以将 RestTemplate 配置的更为完善,后者则简化了配置虽然配置多样性不如前者,但是日常使用调用些 API 还是足以使用,特别针对有多个不同的根地址时,更灵活。
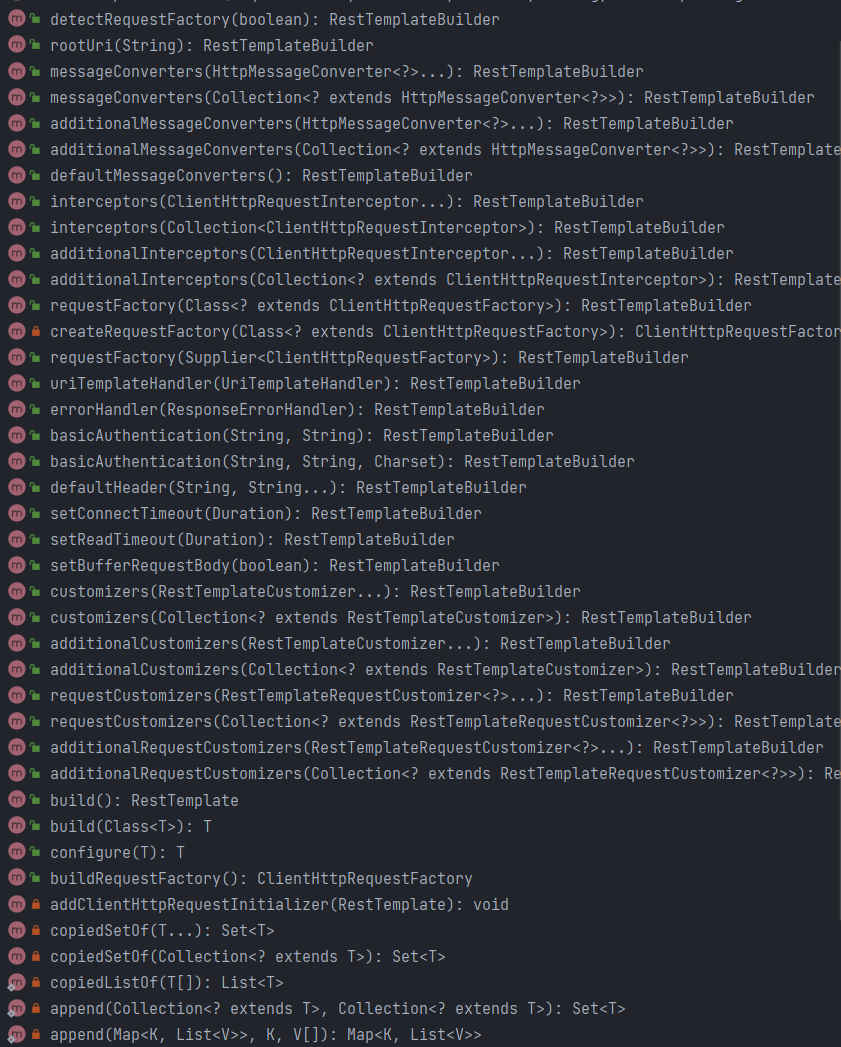
# RestTemplate API 使用
在使用 RestTemplate 前先让我们看看 RestTemplate 有哪些 API。
相信大家看到这么多方法,一定很头大,但是我们仔细看上述的方法,我们可以提取出主要的几种方法是(这里只讨论 Http 请求的):
GETPOSTPUTDELETEHEADOPTIONSEXCHANGEEXECUTE
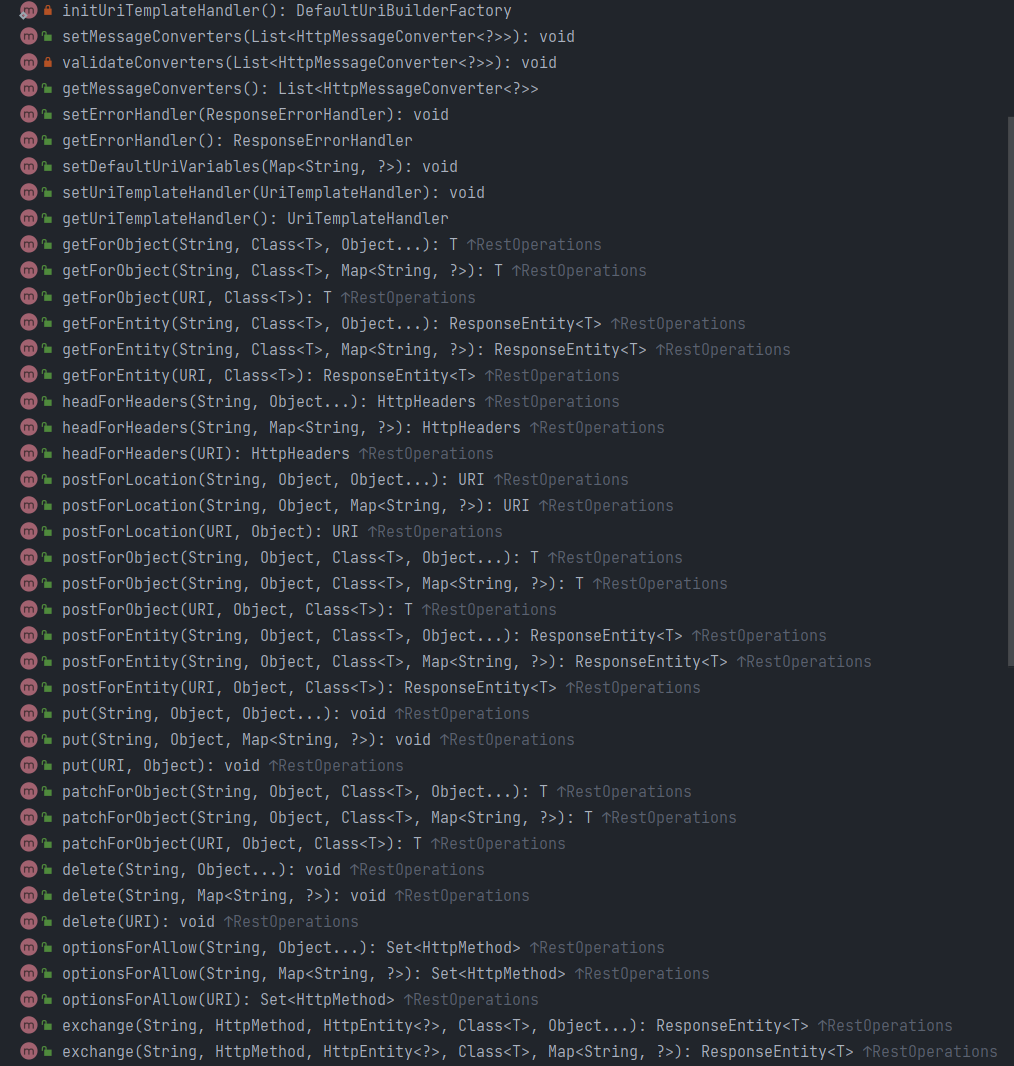
# GET
通过上图我们可以发现 RestTemlate 发送 GET 请求的方法有两种:
public <T> T getForObject(...)public <T> ResponseEntity<T> getForEntity(...)
# getForEntity()
后缀带有 Entity 的方法都代表返回一个 ResponseEntity<T>,ResponseEntity<T> 是 Spring 对 HTTP 请求响应的封装,包括了几个重要的元素,如响应码,contentType、contentLength、响应消息体等。
如通过 getStatusCode()、getStatusCodeValue() 等方法获取状态信息:
ResponseEntity<Object> forEntity = restTemplate.getForEntity("https://www.youngkbt.cn", Object.class);
if(forEntity.getStatusCode() == HttpStatus.OK) {
	// 请求成功
}
2
3
4
通过它继承父类(HttpEntity<T>)的 getHeader() 方法我们可以获取 contentType、contentLength、响应消息体等。比如下面这个例子。
public void restTemplateTest() {
    ResponseEntity<Object> forEntity = restTemplate.getForEntity("https://www.youngkbt.cn", Object.class);
    System.out.println("状态码:" + forEntity.getStatusCode());
    System.out.println("状态码内容:" + forEntity.getStatusCodeValue());
    HttpHeaders headers = forEntity.getHeaders();
    System.out.println("响应头:" + headers);
    System.out.println("响应内容:" + forEntity.getBody());
}
2
3
4
5
6
7
8
该例子中 getForEntity() 方法的第一个参数为我要调用服务的 URL,第二个参数则为响应内容的类的类型(Java嘛,万物皆对象)还可以添加第三个参数,第三个参数为一个可变参数代表着调用服务时的传参。
即:
public void restTemplateTest() {
    ResponseEntity<Object> forEntity = restTemplate.getForEntity("https://www.youngkbt.cn/{id}/{name}", Object.class, 1, "kele");
}
2
3
Spring 自动将 1 放到 id 的位置,kele 放到 name 的位置:https://www.youngkbt.cn/1/kele。
第三个参数可以使用 key-value 的 map 来传入参数。
如果您想在 URL 后面携带参数,则只能通过 ? 和 & 的形式添加:
public void restTemplateTest() {
    ResponseEntity<Object> forEntity = restTemplate.getForEntity("https://www.youngkbt.cn?id=1&name=kele", Object.class, 1, "kele");
}
2
3
# getForObject()
相比于前者 getForEntity(),该方法则是,更偏向于直接获取响应内容的,因为他直接返回响应实体的 body(响应内容)。比如下面这个例子
public void restTemplateTest() {
    Object body = restTemplate.getForObject("https://www.youngkbt.cn", Object.class);
    System.out.println(body);
}
2
3
4
body 就是前面 forEntity.getBody()。我们所需要的数据就在这里面。
当你只需要返回的响应内容时,使用 getForObject() 是一个很好的选择,但当你需要获得更详细的响应信息,如响应头中的信息,你就只能选择 getForEntity() 了。
# POST
POST 请求有如下三种方法:
public URI postForLocation(...)public <T> T postForObject(...)public <T> ResponseEntity<T> postForEntity(...)
后两种用法与 GET 基本一致。
当然 POST 相较 GET 请求,上传的参数(JSON 格式),如果用过 Axios,就知道 GET 传参的 parmas,POST 传参的 data。
所以后两种用法,会多出一个传参,用来传 JSON 格式的参数。下面介绍 postForLocation 方法,顺便有。
# postForEntity()
该方法有三个参数:
- 第一个为调用服务的地址(URL)
- 第二个参数表示上传的参数(JSON 格式提交)
- 第三个表示返回响应内容的具体类型
- 第四个参数也用于指定参数(在 URL 中添加
{}占位符)
public void restTemplateTest() {
    User user = new User();
    user.setName("鲁大师");

    ResponseEntity<Object> objectResponseEntity = restTemplate.postForEntity("https://www.youngkbt.cn", user, Object.class);
    System.out.println("消息响应内容:" + objectResponseEntity.getBody());
}
2
3
4
5
6
7
# postForObject()
使用方法与 getForObject 类似只是多了一个传入对象参数(传入方式与 postForEntity() 相同)。
public void restTemplateTest() {
    User user = new User();
    user.setName("鲁大师");

    ResponseEntity<Object> objectResponseEntity = restTemplate.getForObject("https://www.youngkbt.cn", user, Object.class);
    MediaType contentType = objectResponseEntity.getHeaders().getContentType();
    System.out.println(contentType);
    System.out.println("消息响应内容:"+objectResponseEntity.getBody());
}
2
3
4
5
6
7
8
9
# postForLocation()
postForLocation 传参用法与前两者一致,只不过返回从实体变成了一个 URL,因此它不需要指定返回响应内容的类型。
public void restTemplateTest() {
    User user = new User();
    user.setName("鲁大师");
    URI uri = restTemplate.postForLocation("https://www.youngkbt.cn", user);

    System.out.println(uri);
}
2
3
4
5
6
7
这个只需要服务提供者返回一个 URI 即可,该 URI 返回值体现的是:用于提交完成数据之后的页面跳转,或数据提交完成之后的下一步数据操作 URI。
# 使用 POST 以表单方式提交
上面 POST 请求直接传入 user 实体类,那么如何传入一个请求头呢?
这里我们着重说一下,如何自己封装一个请求体(请求头 + 参数)。
我们需要用到如下几个类:
HttpHeadersMultiValueMap<K,V>HttpEntity<T>
HttpHeaders
故名思意,就是用来封装 Http 请求的请求头的,这里我们要设置他的 ContentType 为 MediaType.APPLICATION_FORM_URLENCODED,以使得我们提交的参数是以 Form(表单)的形式提交。具体的其他形式可以进入 MediaType 源码查看对应的常量。
public void restTemplateTest() {
    // 设置请求头, x-www-form-urlencoded 格式的数据
    HttpHeaders httpHeaders = new HttpHeaders();
    // 这里指定参数以 UTF-8 编码格式传输
    MediaType mediaType = new MediaType(MediaType.APPLICATION_FORM_URLENCODED, UTF_8);
    httpHeaders.setContentType(mediaType);
    // 在请求体自定义内容
    httpHeaders.set("token", "sdgsuidfhsdgasdfasd45");
    httpHeaders.set("username", "kele");
    // 提交参数设置
    MultiValueMap<String, String> map = new LinkedMultiValueMap<>();
    map.add("name","kele");
}
2
3
4
5
6
7
8
9
10
11
12
13
MultiValueMap 是什么?下面介绍。
#
MultiValueMap<K,V>
该类是用来封装请求参数的,是以 key-value 的形式封装但是以单个 key 对应多个 value 的格式传输(也就是是以单个 key:[value...] 的格式传输的)。
进入源码,我们可以发现,该类继承了 Map<K, List<V>> 类,并且我们从名字得出,这个二次封装的类就是一个 Map 类,且和 Java 的 Map 区别之一就在于:
- MultiValueMap 的 value 是一个集合
HttpHeaders 其实就是实现了 MultiValueMap 的类。
public class HttpHeaders implements MultiValueMap<String, String>, Serializable {}
例子:
public void multiValueMapTest() {
    // 提交参数设置
    MultiValueMap<String, String> map = new LinkedMultiValueMap<>();
    map.add("name", "kele");
}
2
3
4
5
不是说好 value 值是一个集合吗,为什么可以传入一个字符串呢?其实看源码就发现,内部就自动创建一个 List 集合,将 kele 添加进去。
所以我们使用和正常 HashMap 一样,当然我们也可以直接给 add 方法传入一个集合。
#
HttpEntity<T>
HttpHeaders 是封装请求头的类,MultiValueMap 是封装参数的类,取代前面 user,那么我们需要一个新的类,封装这两个类,然后交给 RestTemplate。
所以 HttpEntity 类是用来封装请求的,主要作用就是将请求头和请求体封装在一起成为一个请求实体 T 用来指定用来封装参数的容器的类型。
MultiValueMap<String, String> map = new LinkedMultiValueMap<>();
HttpHeaders httpHeaders = new HttpHeaders();

// 封装请求头
HttpEntity<MultiValueMap<String, String>> request = new HttpEntity<>(map);

// 封装请求头
HttpEntity<MultiValueMap<String, String>> request = new HttpEntity<>(httpHeaders);

// 封装参数和请求头
HttpEntity<MultiValueMap<String, String>> request = new HttpEntity<>(map, httpHeaders);
2
3
4
5
6
7
8
9
10
11
构造函数有三个,根据需求传入即可。
为什么单个传 map 或 httpHeaders 都是封装请求头?
前面说过,HttpHeaders 其实就是实现了 MultiValueMap 接口,所以不管传入哪个,都是请求头,看源码:
public HttpEntity(T body) {
    this(body, null);
}

/**
	 * Create a new {@code HttpEntity} with the given headers and no body.
	 * @param headers the entity headers
	 */
public HttpEntity(MultiValueMap<String, String> headers) {
    this(null, headers);
}

/**
	 * Create a new {@code HttpEntity} with the given body and headers.
	 * @param body the entity body
	 * @param headers the entity headers
	 */
public HttpEntity(@Nullable T body, @Nullable MultiValueMap<String, String> headers) {
    this.body = body;
    this.headers = HttpHeaders.readOnlyHttpHeaders(headers != null ? headers : new HttpHeaders());
}
2
3
4
5
6
7
8
9
10
11
12
13
14
15
16
17
18
19
20
21
可以看到 body 就是参数,是个泛型,并非是 MultiValueMap 类。
如果只传一个 MultiValueMap 的对象,则应该如下:
new HttpEntity<>(map, null);
注意:
- map 是什么类型,则 T 是什么类型
- 参数封装类必须是 MultiValueMap,不能是 Map 的其他类,请求头封装类也是如此
测试
通过上述介绍后,我们就可以自己封装一个以 form 形式提交参数的 POST 请求了。
@Test
void contextLoads() {
    // 请求地址
    String url = "https://www.youngkbt.cn";

    // 设置请求头, x-www-form-urlencoded格式的数据
    HttpHeaders httpHeaders = new HttpHeaders();
    httpHeaders.setContentType(MediaType.APPLICATION_FORM_URLENCODED);

    // 提交参数设置
    MultiValueMap<String, String> map = new LinkedMultiValueMap<>();
    map.add("name","kele");

    // 组装请求体
    HttpEntity<MultiValueMap<String, String>> request = new HttpEntity<>(map, httpHeaders);


    // 发送 post 请求并打印结果 以 String 类型接收响应结果 JSON 字符串
    String s = restTemplate.postForObject(url, request, String.class);
    System.out.println(s);
}
2
3
4
5
6
7
8
9
10
11
12
13
14
15
16
17
18
19
20
21
22
可以通过拦截器拦截了请求并对请求头进行拆包,发现 ContentType 已经被修改成了 x-www-form-urlencoded 格式了。
# PUT
使用方法与 postForEntity() 参数基本一致,只是 PUT 方法没有返回值(也就不必去设置响应内容的类型了)。
public void putTest() {
    // 请求地址
    String url = "https://www.youngkbt.cn";
    User user = new User();
    user.setName("kele");

    restTemplate.put(url, user);
}
2
3
4
5
6
7
8
# DELETE
与 PUT 一样,DELETE 方法只有一类
void delete()
delete() 可以指定 url 中的中的参数,但是 RestTemplate 的 delete() 方法是不支持上传 requestBody 的。
public void putTest() {
    // 请求地址
    String url = "https://www.youngkbt.cn";
    restTemplate.delete(url);
}
2
3
4
5
# HEADER
HEADER 也只有一类方法
public HttpHeaders headForHeaders()
主要用来发送请求获取响应头部信息,但是像 DELETE、PUT 这类没有响应的方法,是不能使用该方法的(因为没有响应也就没有响应头了)。
public void putTest() {
    // 请求地址
    String url = "https://www.youngkbt.cn";
    HttpHeaders httpHeaders = restTemplate.headForHeaders(url);
    System.out.println(httpHeaders);
}
2
3
4
5
6
# OPTIONS
public Set<HttpMethod> optionsForAllow()
该方法的主要用来判断该服务地址,能够使用那种方法去执行
public void putTest() {
    // 请求地址
    String url = "https://www.youngkbt.cn";
    Set<HttpMethod> httpMethods = restTemplate.optionsForAllow(url);
    System.out.println(httpMethods);
}
2
3
4
5
6
# EXCHANGE
<T> ResponseEntity<T> exchange()
该接口与其他接口不同。
- 该方法允许用户指定请求的方法(GET,POST,PUT 等)
- 可以在请求中增加 body 以及头信息,其内容通过参数
HttpEntity<?> requestEntity描述 - exchange 支持含参数的类型(即泛型)作为返回类型,该特性通过 ParameterizedTypeReferenceresponseType 描述
该方法支持五个参数:
- 第一个是服务地址
- 第二个是请求方法
- 第三个是写入的请求实体
- 第四个是响应内容的类型
- 第五个是扩展模板的变量或包含
URI模板变量的映射
public void putTest() {
    // 请求地址
    String url = "https://www.youngkbt.cn";
    User user = new User();
    user.setName("kele");
    HttpHeaders httpHeaders = new HttpHeaders();
    httpHeaders.setContentType(MediaType.APPLICATION_JSON);
    HttpEntity<User> userHttpEntity = new HttpEntity<>(user, httpHeaders);

    ResponseEntity<Object> exchange = restTemplate.exchange(url, HttpMethod.POST, userHttpEntity, Object.class);
    System.out.println(exchange);
}
2
3
4
5
6
7
8
9
10
11
12
上述代码模拟了一个简单的 POST 请求 可以理解为可以动态的指定请求方法和请求实体的一个方法。
# GET 请求如何携带参数?
GET 请求如何携带 HttpEntity 参数?我们知道 GET 最常用的传参方式就是在 URL 后面拼接参数,但是如何像 POST 请求一样,添加 RequestBody 参数呢?
那么只能用 exchange 接口来传参:
public void getTest() {
    // 请求地址
    String url = "https://www.youngkbt.cn";
    User user = new User();
    user.setName("kele");
    HttpHeaders httpHeaders = new HttpHeaders();
    httpHeaders.setContentType(MediaType.APPLICATION_JSON);
    HttpEntity<User> userHttpEntity = new HttpEntity<>(user, httpHeaders);

    ResponseEntity<Object> exchange = restTemplate.exchange(url, HttpMethod.GET, userHttpEntity, Object.class);
    System.out.println(exchange);
}
2
3
4
5
6
7
8
9
10
11
12
将请求方式换成 GET。
# EXECUTE
<T> T execute()
该方法就是执行请求的方法,我们可以发现上述的所有方法的最后执行都是调用的该方法执行,可以说这才是 RestTemplate 内部调用的 最终接口,所以他在 RestTemplate 中十分重要。
该方法有五个参数:
- 服务地址
- 请求的方法
- 准备请求的对象(
requestCallback) - 从响应中提取返回值的对象
- 扩展模板的变量或包含
URI模板变量的映射
execute()
@Override
@Nullable
public <T> T execute(String url, HttpMethod method, @Nullable RequestCallback requestCallback,
                     @Nullable ResponseExtractor<T> responseExtractor, Object... uriVariables) throws RestClientException {

    URI expanded = getUriTemplateHandler().expand(url, uriVariables);
    return doExecute(expanded, method, requestCallback, responseExtractor);
}
2
3
4
5
6
7
8
通过上述源码我们可以发现 execute() 方法只是将我们传入的 String 类型的 URL 转换为了 URL 类型,最后执行请求是由 doExecute() 方法。
doExecute()
这里需要了解两个类:RequestCallback 和 ResPonseExtractor。
RequestCallback: 用于操作请求头和 body,在请求发出前执行。不需要关心关闭请求或处理错误:这都将由 RestTemplate 处理。
该接口有两个实现类:
AcceptHeaderRequestCallback:只处理请求头,用于getXxx()方法httpEntityRequestCallback:继承于 AcceptHeaderRequestCallback。可以处理请求头和 body,用于putXxx()、postXxx()和exchange()方法
该接口在 RestTemplate 中同样有两个实现类:
HeadersExtractor:提取响应HttpHeaders的响应提取器。直接提取响应体中的响应头ResponseEntityResponseExtractor<T>:HttpEntity的响应提取器。可以获取响应实体里面包括响应头,响应体等。具体请查看HttpEntity
public void executeTest() {
    // 请求地址
    String url = "https://www.youngkbt.cn";
    User user = new User();
    user.setName("kele");
    HttpHeaders httpHeaders = new HttpHeaders();
    httpHeaders.setContentType(MediaType.APPLICATION_JSON);
    HttpEntity<User> userHttpEntity = new HttpEntity<>(user, httpHeaders);

    ResponseEntity<Object> execute = restTemplate.execute(url, HttpMethod.POST, restTemplate.httpEntityCallback(userHttpEntity), restTemplate.responseEntityExtractor(Object.class));
    System.out.println(execute);
}
2
3
4
5
6
7
8
9
10
11
12
# 可变参数
前面我们介绍方法的时候发现有个一个可变参数,那个参数被描述成了扩展模板的变量或是包含 URI 模板变量的映射。
我们来简单看一下这个参数,我们知道请求传参可以通过 url 拼接参数的方式传参,拼接参数也分为两种:
路径中嵌入占位的格式(
www.youngkbt.cn/{1}/post)也叫模板映射末尾添加
Key-value格式(http://www.youngkbt.cn?name="kele"),即扩展模板的变量当我们最后一参数传入 Map 时会以
key-value的格式拼接在URL后(通俗的说就是这样设置的变量会跟着URL路径后面)
public void test() {
    // 请求地址
    String url = "https://www.youngkbt.cn";
    HashMap<String, String> map = new HashMap<>();
    map.put("name","kele");
	// 此时 url 为 http://www.youngkbt.cn?name=kele
    Object forObject = restTemplate.getForObject(url, Object.class, map);

    System.out.println(forObject);
}
2
3
4
5
6
7
8
9
10
当我们传入简单的对象如 String,Integer 时且路径中有嵌入的占位符时就会代替调用 URL 中占位符
public void test() {
    // 请求地址
    String url = "https://www.youngkbt.cn/{2}/{27}/get";
    HashMap<String, String> map = new HashMap<>();
    // 此时 url 为 http://www.youngkbt.cn/99/kele/get
    Object forObject = restTemplate.getForObject(url, Object.class, 99, kele);
    System.out.println(forObject);
}
2
3
4
5
6
7
8
{} 里的占位符名随便填写。
# 参考文章
https://blog.csdn.net/D1842501760/article/details/124216538